> ## Documentation Index
> Fetch the complete documentation index at: https://support.metaview.ai/llms.txt
> Use this file to discover all available pages before exploring further.
# Workday
> Configure the Workday Recruiting integration for your workspace.
Metaview integrates with Workday Recruiting via SOAP Web Services. To connect your Workday tenant to Metaview, you will need to create an Integration System User (ISU), configure a security group with the required permissions, and provide your credentials to Metaview.
You will need Workday administrator access to complete this setup.
## Connect Workday Recruiting to Metaview
### 1. Create an Integration System User (ISU)
From the Workday search bar, search for **Create Integration System User**. Create a new ISU that will be used exclusively for the Metaview integration (e.g. `ISU_Metaview`).
Set a password for the ISU and make a note of both the **username** and **password** — you will need these later.
We recommend naming the ISU something recognizable like `ISU_Metaview` so it's easy to identify in your security configuration.
### 2. Create a security group and assign the ISU
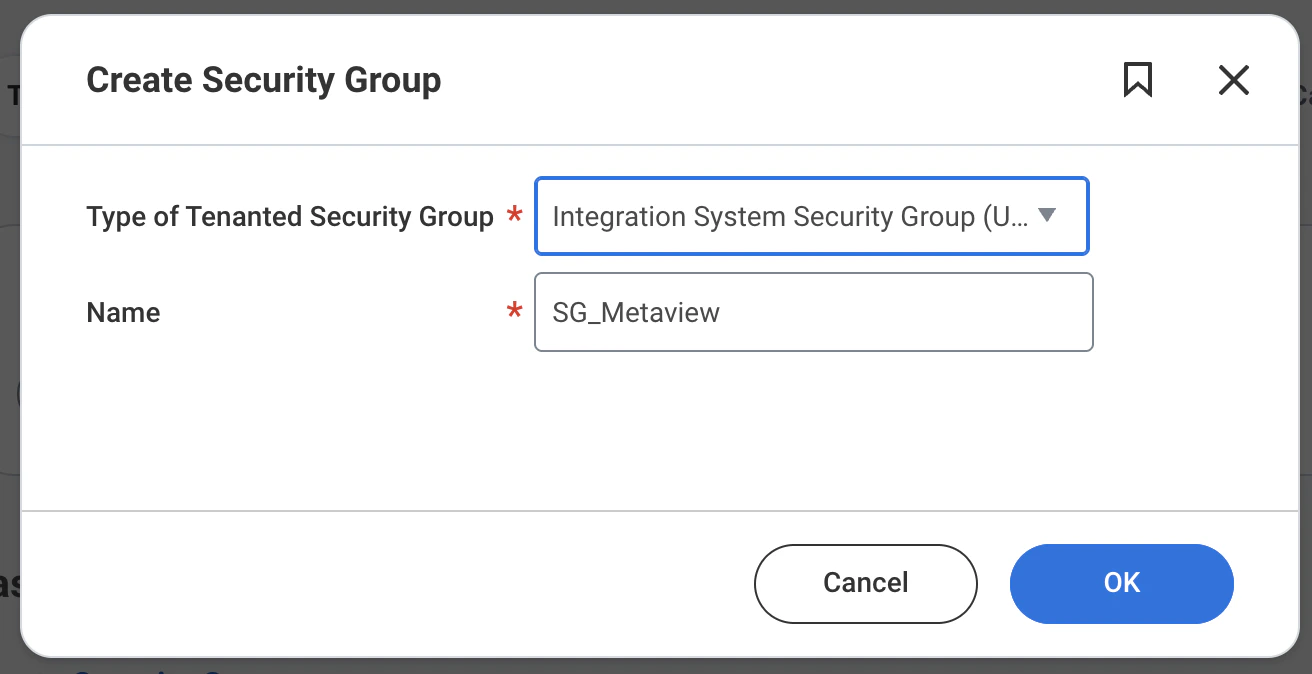
Search for **Create Security Group** in the Workday search bar. Create a new **Integration System Security Group (Unconstrained)** and name it appropriately (e.g. `ISSG_Metaview`).
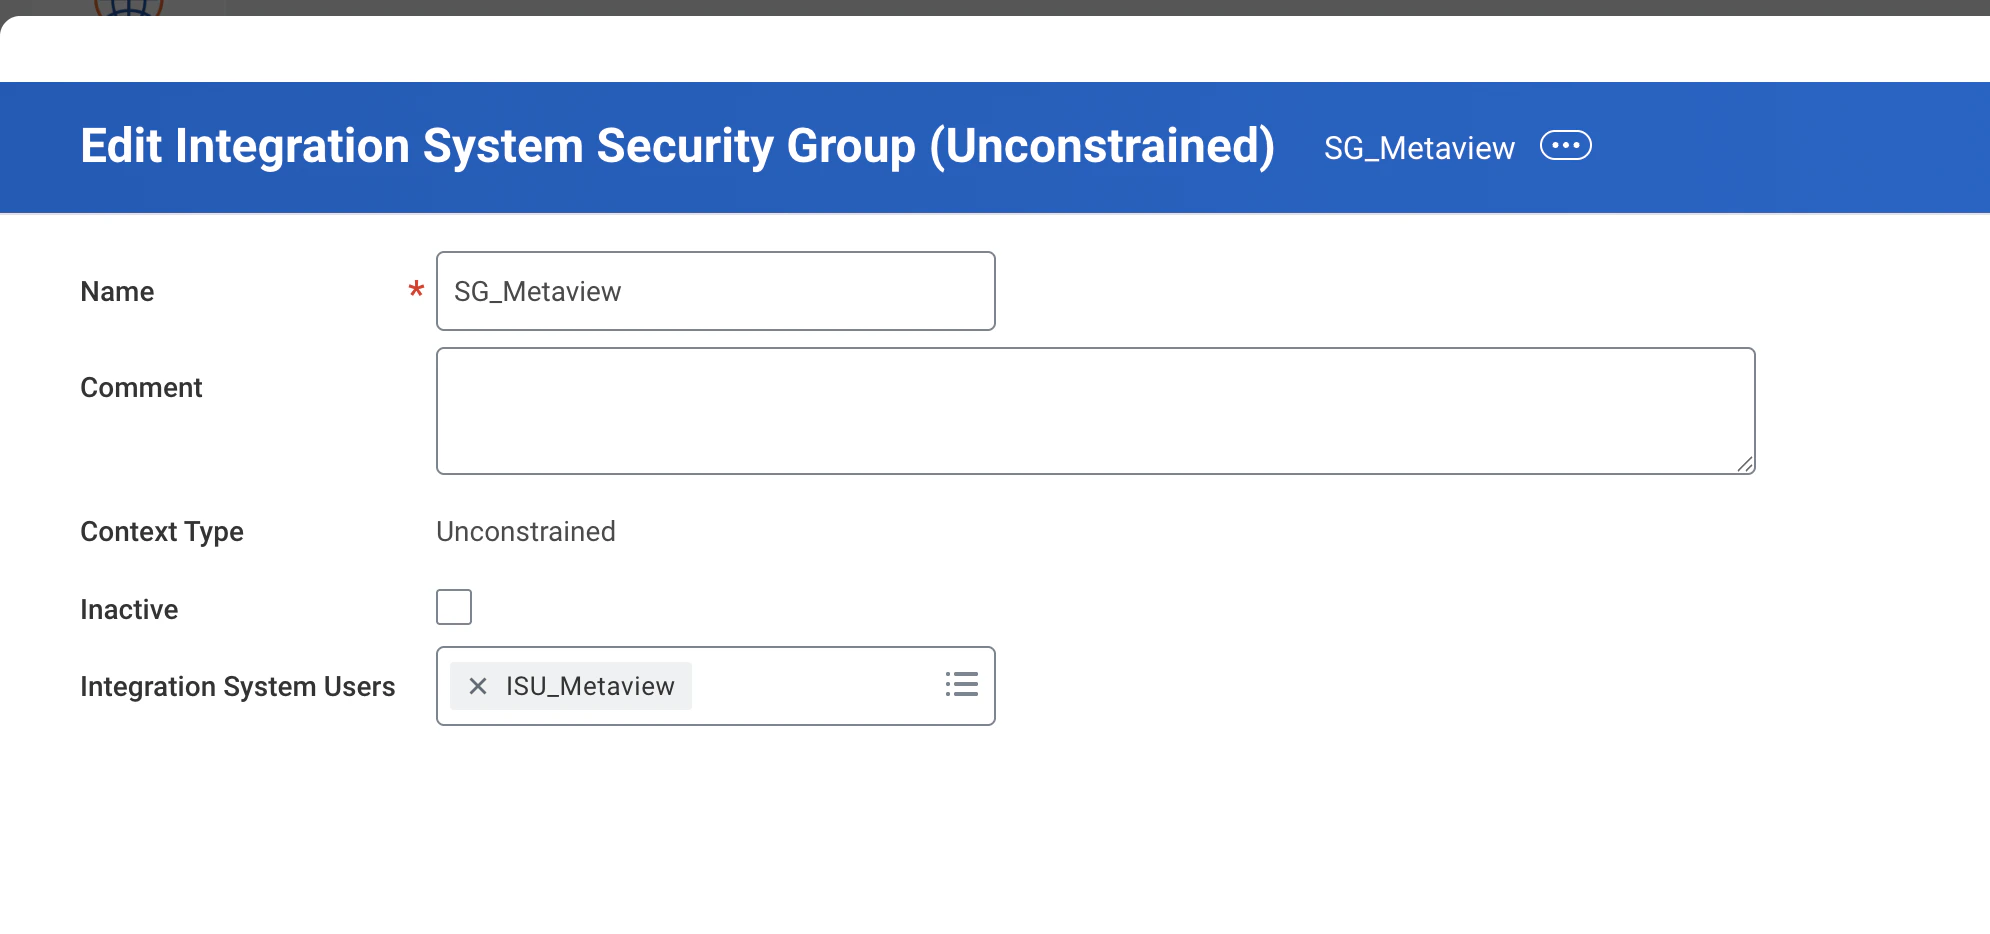
 Once the security group is created, add the ISU you created in Step 1 as a member of this group.
 ### 3. Maintain domain permissions for the security group
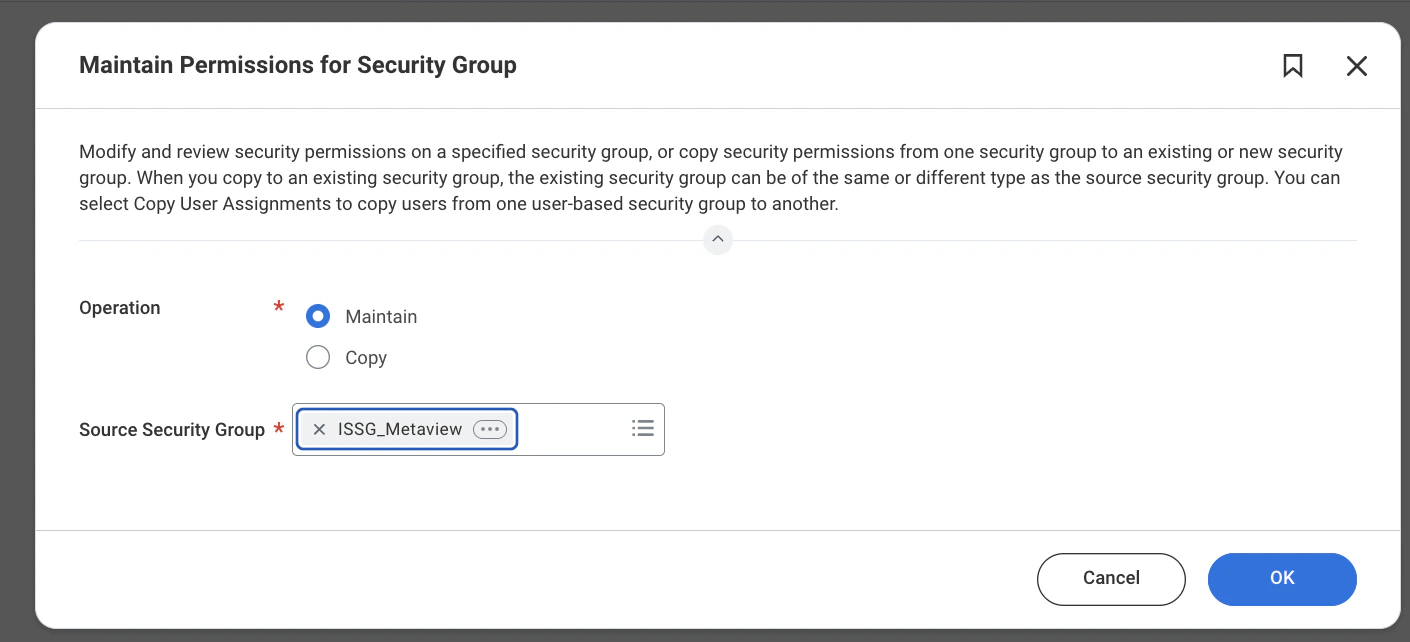
Search for **Maintain Permissions for Security Group** in the Workday search bar. When prompted, select **Maintain** (not **Copy**) as the operation, and choose the security group you created in Step 2.
### 3. Maintain domain permissions for the security group
Search for **Maintain Permissions for Security Group** in the Workday search bar. When prompted, select **Maintain** (not **Copy**) as the operation, and choose the security group you created in Step 2.
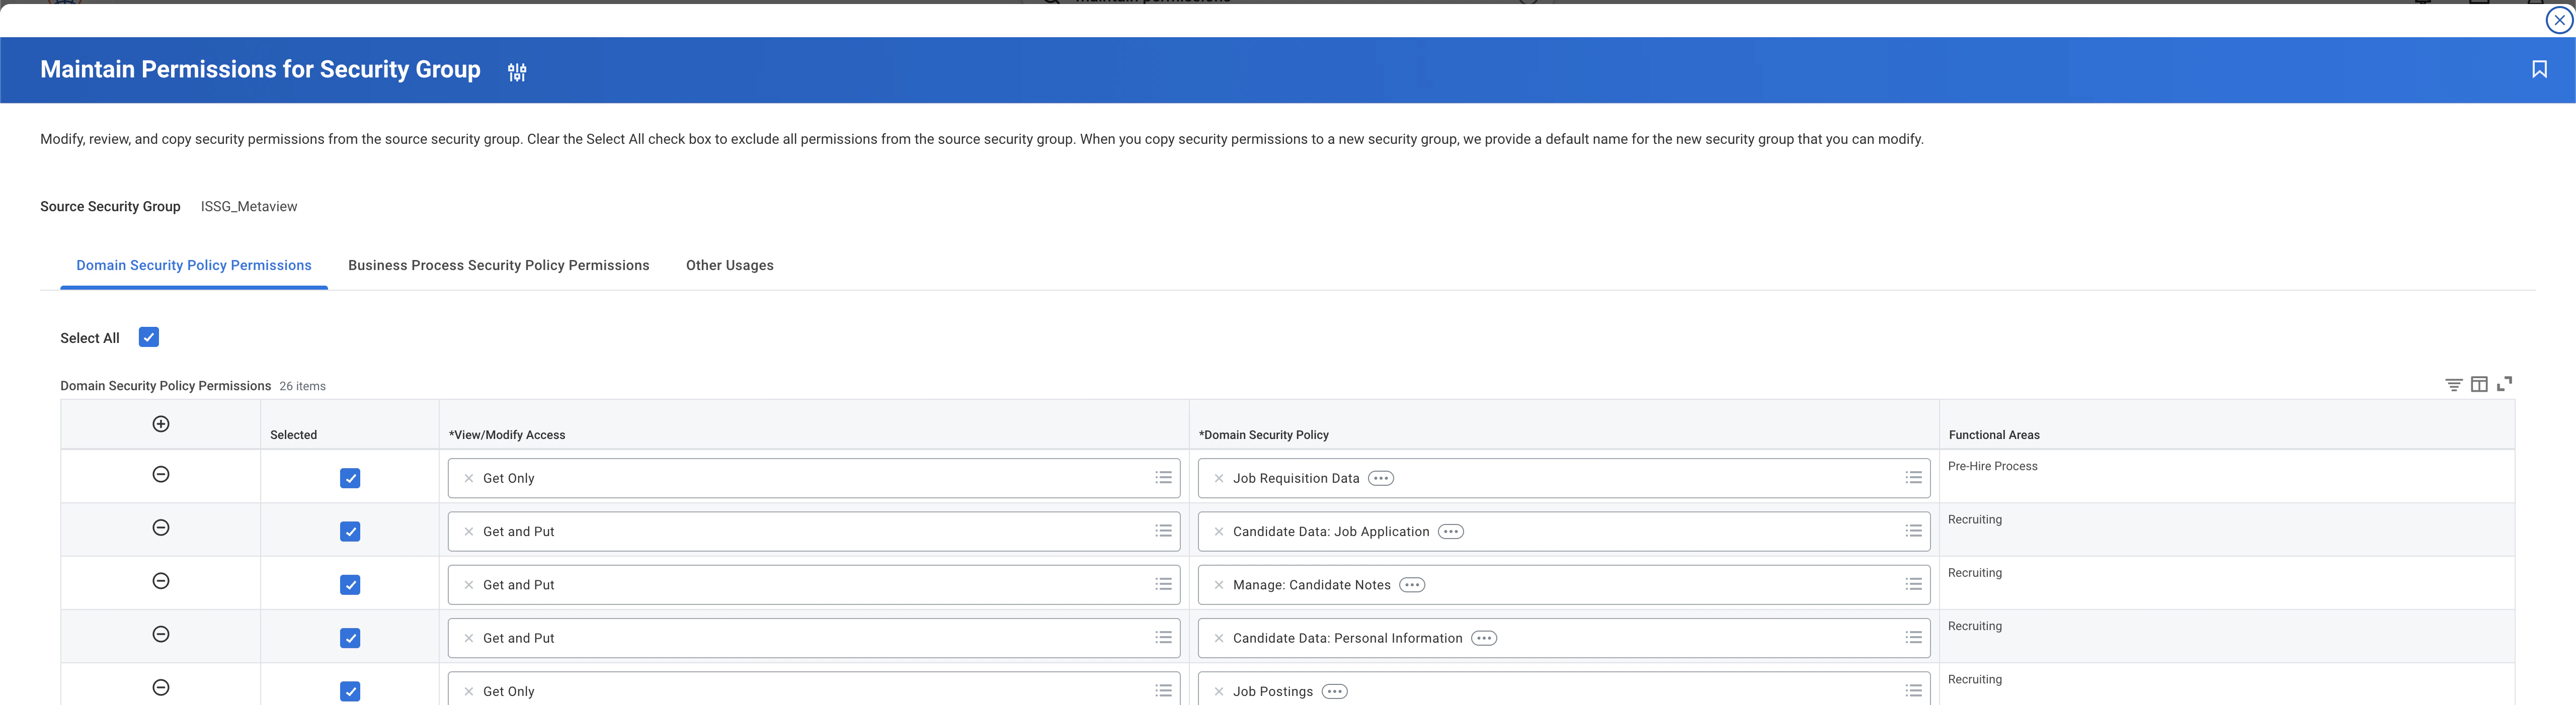
 On the **Domain Security Policy Permissions** tab, add all of the required permissions listed below. Each permission needs the correct **View/Modify Access** level (**Get Only** or **Get and Put**) and the corresponding **Domain Security Policy**.
 | View/Modify Access | Domain Security Policy | Functional Area |
| ------------------ | --------------------------------------------- | --------------------------- |
| Get Only | Job Requisition Data | Pre-Hire Process |
| Get and Put | Candidate Data: Job Application | Recruiting |
| Get and Put | Manage: Candidate Notes | Recruiting |
| Get and Put | Candidate Data: Personal Information | Recruiting |
| Get Only | Job Postings | Recruiting |
| Get Only | Integration Build | Integration |
| Get and Put | Candidate Data: Other Information | Recruiting |
| Get and Put | Pre-Hire Data: Name and Contact Information | Pre-Hire Process |
| Get Only | Worker Data: Workers | Staffing |
| Get Only | Worker Data: Active Employees | Staffing |
| View and Modify | Candidate Data: Other Information | Recruiting |
| Get and Put | Set Up: Pre-Hire Process | Pre-Hire Process |
| Get and Put | Prospects | Recruiting, Talent Pipeline |
| Get and Put | Move Candidate | Recruiting |
| Get and Put | Candidate Data: Attachments | Recruiting |
| Get and Put | Staffing Actions: Job Requisition Recruiting | Staffing |
| Get Only | Worker Data: Public Worker Reports | Staffing |
| Get Only | Worker Data: All Positions | Staffing |
| Get and Put | Job Requisitions for Recruiting | Recruiting |
| Get Only | Worker Data: Organization Information | Staffing |
| Get Only | Candidate Data: Interview Schedule | Recruiting |
| Get Only | Interview Integrations | Recruiting |
| Get and Put | Candidate Data: Edit Job Application | Recruiting |
| Get and Put | Manage Pre-Hire Data | Pre-Hire Process |
| Get and Put | Staffing Actions: Attachments | Staffing |
| Get and Put | Worker Data: Edit and Delete Worker Documents | Personal Data |
| Get and Put | Manage Pre-Hire Process | Pre-Hire Process |
| Get Only | Setup: Skills and Experience | Talent Management |
| Get Only | Setup: Talent | Talent Management |
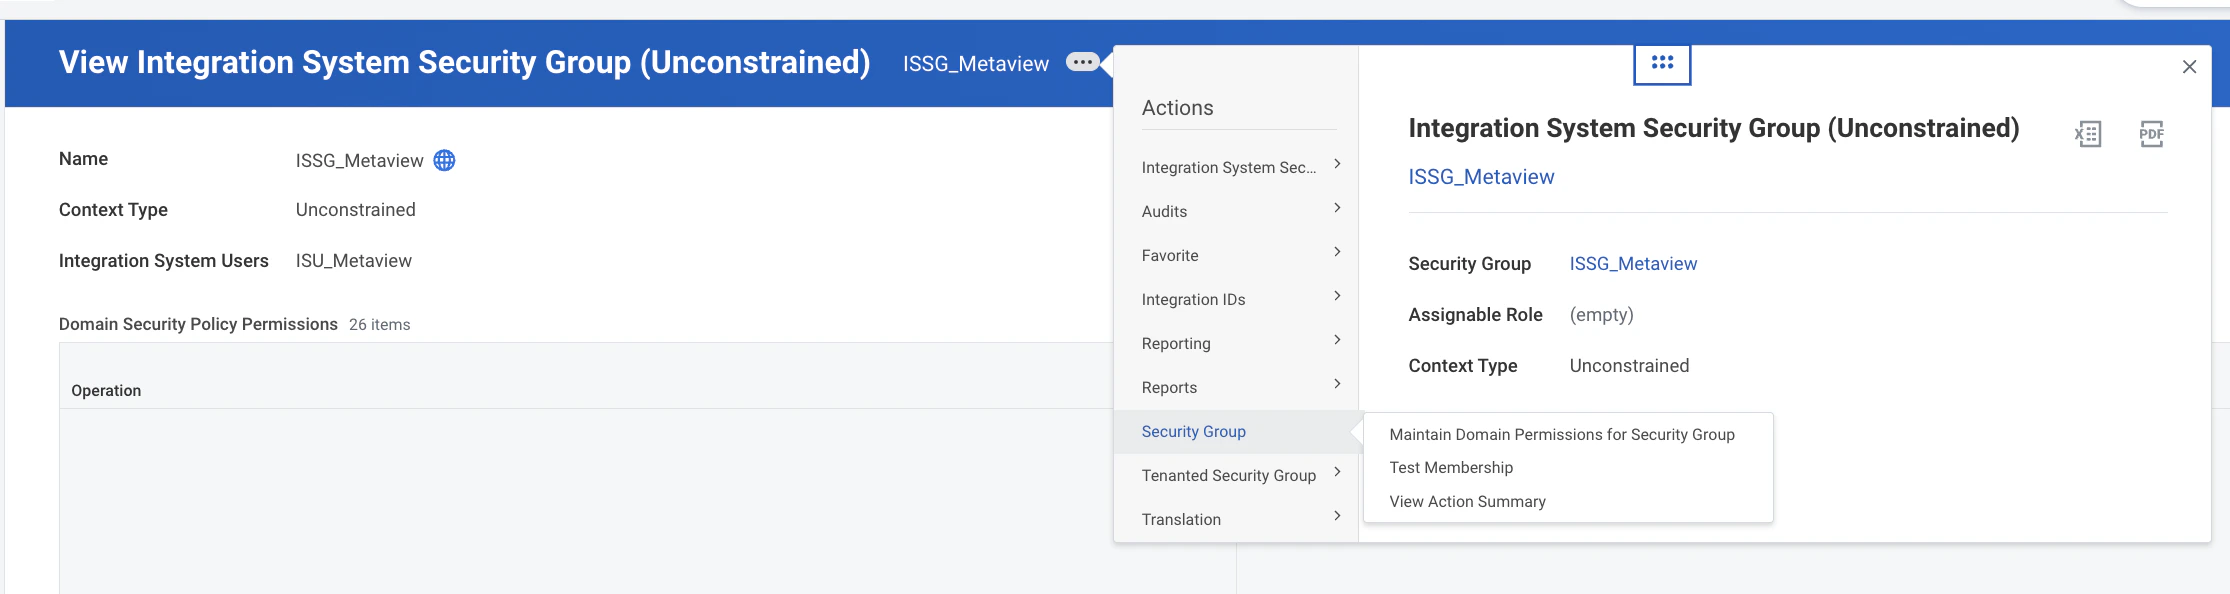
You can also find the security group from the **View Integration System Security Group** page and use the actions menu to navigate directly to **Maintain Domain Permissions for Security Group**.
| View/Modify Access | Domain Security Policy | Functional Area |
| ------------------ | --------------------------------------------- | --------------------------- |
| Get Only | Job Requisition Data | Pre-Hire Process |
| Get and Put | Candidate Data: Job Application | Recruiting |
| Get and Put | Manage: Candidate Notes | Recruiting |
| Get and Put | Candidate Data: Personal Information | Recruiting |
| Get Only | Job Postings | Recruiting |
| Get Only | Integration Build | Integration |
| Get and Put | Candidate Data: Other Information | Recruiting |
| Get and Put | Pre-Hire Data: Name and Contact Information | Pre-Hire Process |
| Get Only | Worker Data: Workers | Staffing |
| Get Only | Worker Data: Active Employees | Staffing |
| View and Modify | Candidate Data: Other Information | Recruiting |
| Get and Put | Set Up: Pre-Hire Process | Pre-Hire Process |
| Get and Put | Prospects | Recruiting, Talent Pipeline |
| Get and Put | Move Candidate | Recruiting |
| Get and Put | Candidate Data: Attachments | Recruiting |
| Get and Put | Staffing Actions: Job Requisition Recruiting | Staffing |
| Get Only | Worker Data: Public Worker Reports | Staffing |
| Get Only | Worker Data: All Positions | Staffing |
| Get and Put | Job Requisitions for Recruiting | Recruiting |
| Get Only | Worker Data: Organization Information | Staffing |
| Get Only | Candidate Data: Interview Schedule | Recruiting |
| Get Only | Interview Integrations | Recruiting |
| Get and Put | Candidate Data: Edit Job Application | Recruiting |
| Get and Put | Manage Pre-Hire Data | Pre-Hire Process |
| Get and Put | Staffing Actions: Attachments | Staffing |
| Get and Put | Worker Data: Edit and Delete Worker Documents | Personal Data |
| Get and Put | Manage Pre-Hire Process | Pre-Hire Process |
| Get Only | Setup: Skills and Experience | Talent Management |
| Get Only | Setup: Talent | Talent Management |
You can also find the security group from the **View Integration System Security Group** page and use the actions menu to navigate directly to **Maintain Domain Permissions for Security Group**.
 ### 4. Activate pending security policy changes
After configuring permissions, you need to activate them. Search for **Activate Pending Security Policy Changes** in the Workday search bar and follow the prompts to activate your changes.
### 4. Activate pending security policy changes
After configuring permissions, you need to activate them. Search for **Activate Pending Security Policy Changes** in the Workday search bar and follow the prompts to activate your changes.
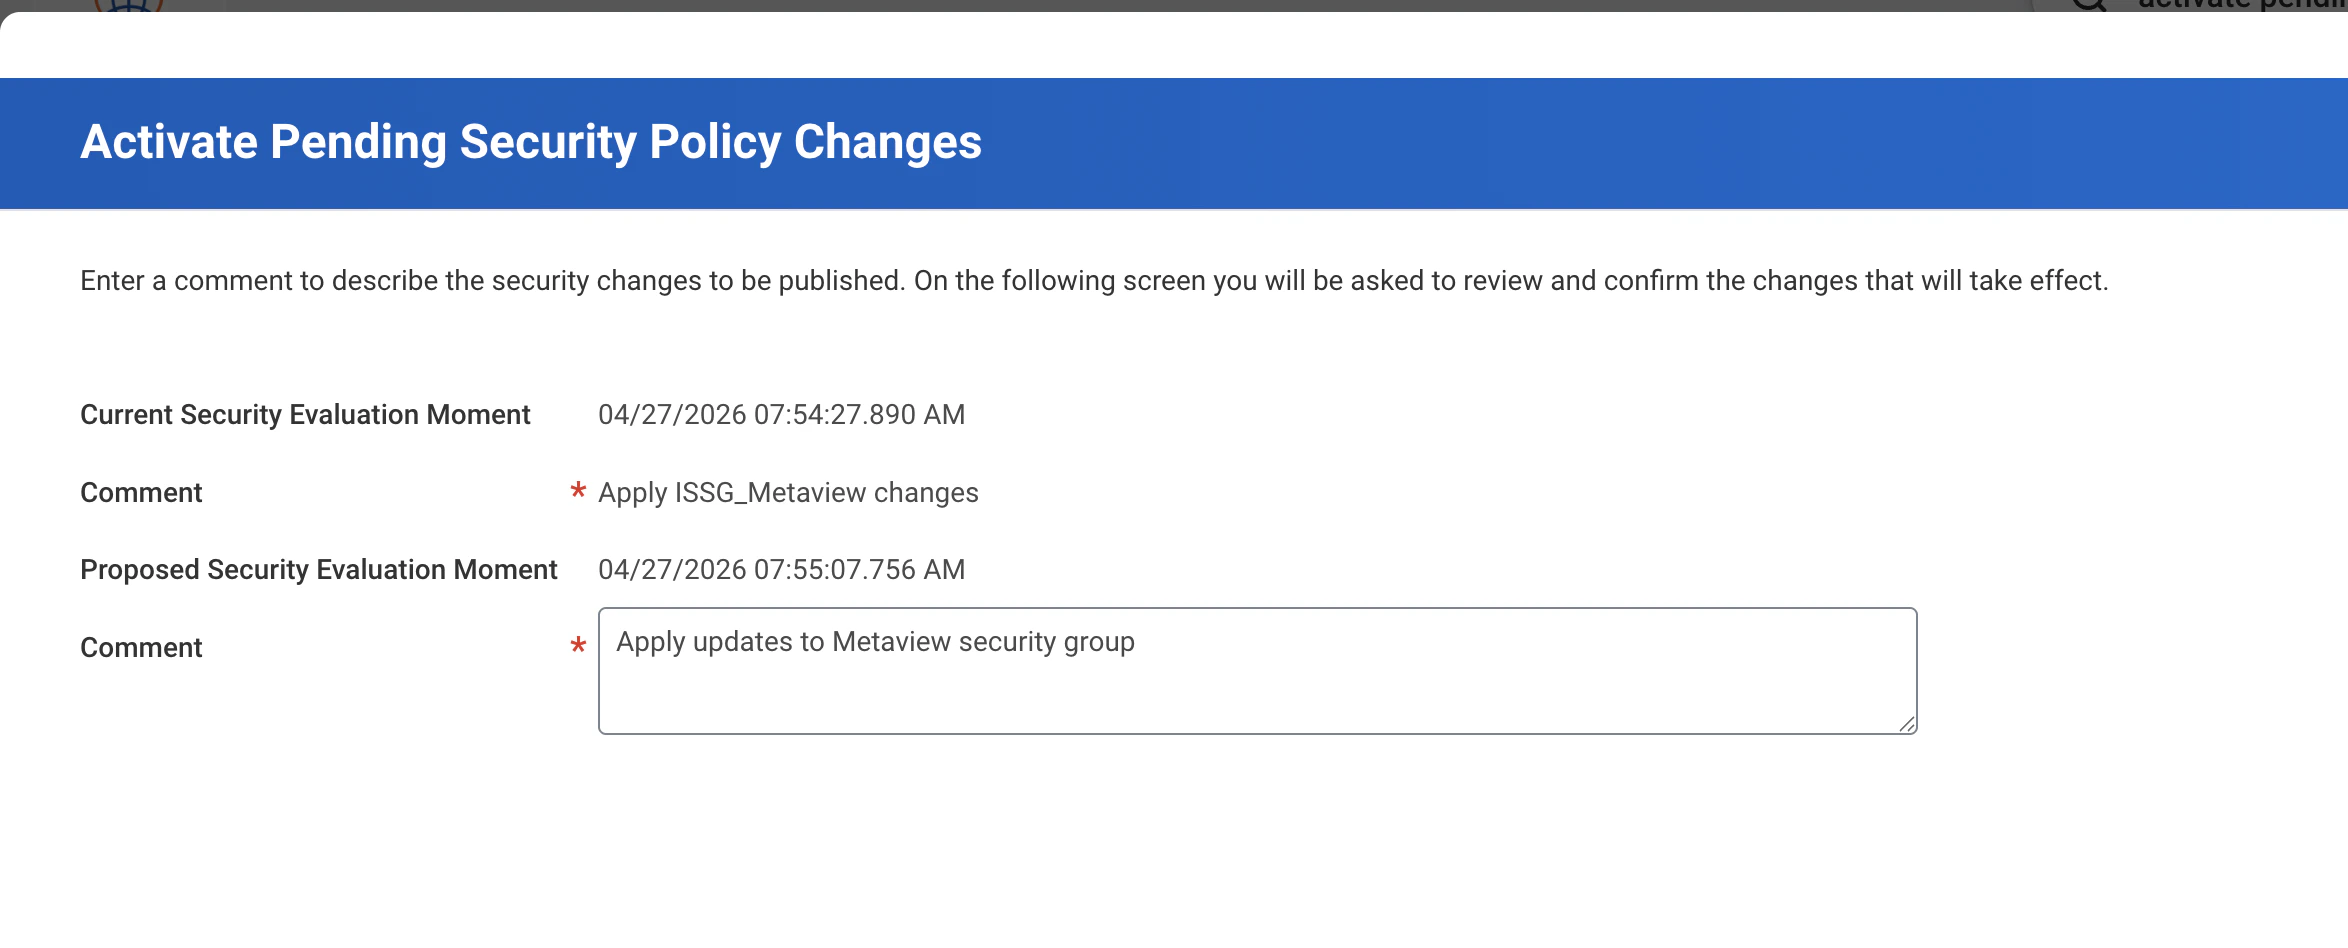 Permissions will not take effect until you complete this activation step.
### 5. Find your Workday host and tenant
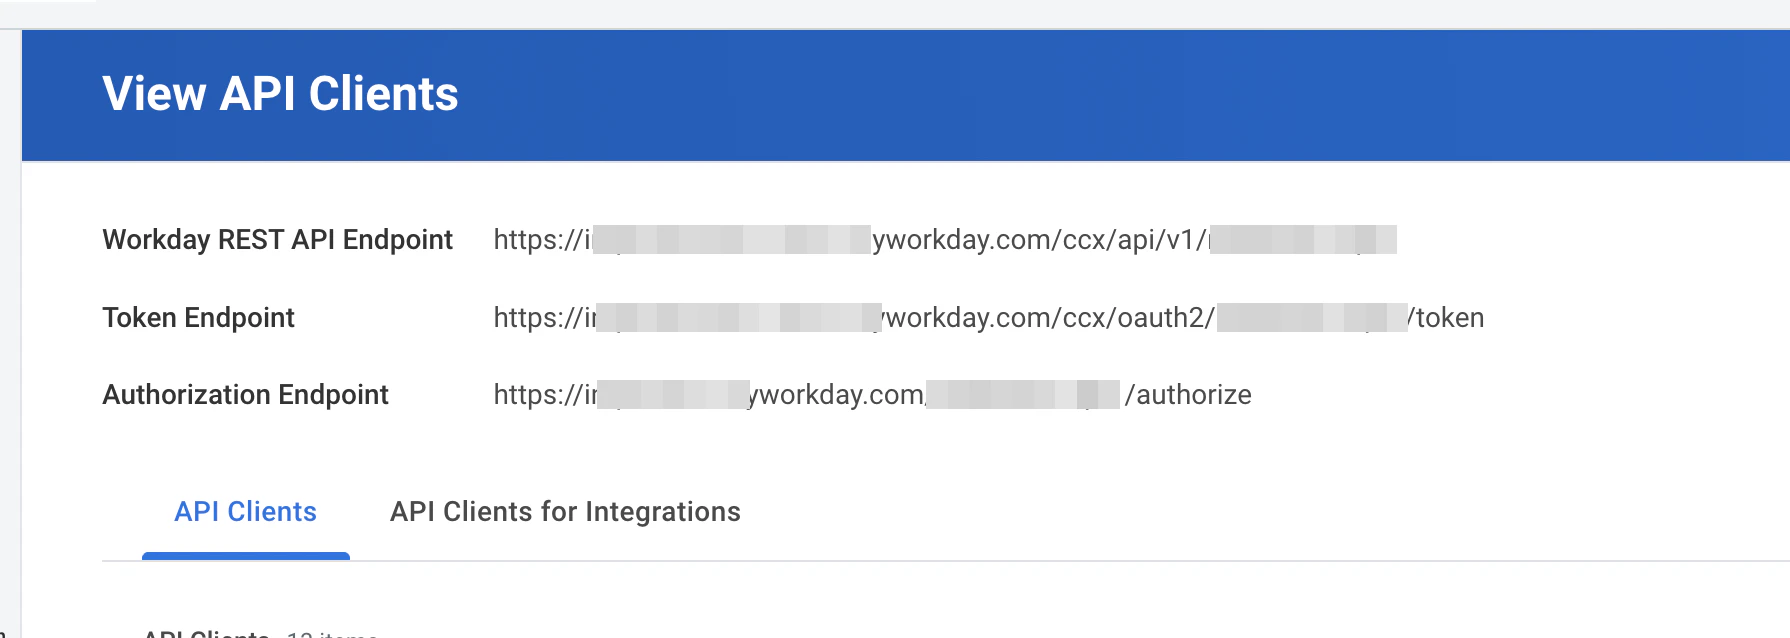
Search for **View API Clients** in the Workday search bar. From the REST API endpoint information displayed, identify:
* **Workday Host** — the datacenter hostname in your Workday URL (e.g. `wd5-impl-services1.workday.com`)
* **Workday Tenant** — your tenant name, found in your service URLs after `/ccx/service/` (e.g. `acme_corp`)
Permissions will not take effect until you complete this activation step.
### 5. Find your Workday host and tenant
Search for **View API Clients** in the Workday search bar. From the REST API endpoint information displayed, identify:
* **Workday Host** — the datacenter hostname in your Workday URL (e.g. `wd5-impl-services1.workday.com`)
* **Workday Tenant** — your tenant name, found in your service URLs after `/ccx/service/` (e.g. `acme_corp`)
 ### 6. Connect your Workday tenant to Metaview
Navigate to [https://my.metaview.app/?settings=workday](https://my.metaview.app/?settings=workday). If you haven't previously signed in to Metaview, you will be prompted to do so.
Enter the following credentials:
| Field | Description |
| ------------------ | ------------------------------------------------------------------------ |
| **Workday Host** | Your Workday datacenter hostname (e.g. `wd5-impl-services1.workday.com`) |
| **Workday Tenant** | Your Workday tenant name (e.g. `acme_corp`) |
| **ISU Username** | The username of the Integration System User created in Step 1 |
| **ISU Password** | The password of the Integration System User created in Step 1 |
Click **Connect** to start the integration. Metaview will validate your credentials and permissions. If the connection is successful, the integration process will begin syncing your data. This can take up to 48 hours to complete, and you will be emailed once the integration is successful.
## Features
Integrating Workday Recruiting with Metaview unlocks the following features:
* Worker and recruiting team member sync
* Ability to post your AI Notes as interview feedback in Workday with one click
* Automatic enrichment of interview details (e.g. candidate name, job requisition title, recruiting step, location)
When your interview in Metaview matches to data in your Workday Recruiting instance, you will see the Workday logo in Metaview. Click on the `Workday logo` to navigate directly to the matched candidate's application in Workday Recruiting.
## Troubleshooting
Although Metaview does not automatically schedule interviews from Workday Recruiting, Metaview will still attempt to match your interviews scheduled by other means to the relevant applications and job requisitions in Workday. The most common reasons why this doesn't happen automatically are:
* Interview or candidate is missing in Workday Recruiting
* Duplicate interviews or candidate applications in Workday
* Data mismatch between Metaview invite and information in Workday (e.g. wrong participants, missing participant, wrong candidate name)
* Insufficient information to match interview or candidate (often occurs when using `Inviting to an ongoing call` or `Upload recordings` options)
* The meeting type is NOT set to **Job interview** or **Debrief**. Please see [Call details](https://support.metaview.ai/using-ai-notes/notes-properties/call-details) for more information.
If you believe that a Metaview interview was not matched or was incorrectly matched to your Workday data, please reach out to [our team](mailto:support@metaview.ai) and provide as much data as possible for our team to properly investigate. Please provide specific examples and the relevant identifiers (e.g. Application ID, Job Requisition ID, Candidate ID) from your Workday Recruiting instance.
## Disconnect your Workday integration
You can disable your Metaview integration directly from within your Metaview account under `Settings` → `Integrations` then select `Disconnect Workday`.
This immediately disconnects Metaview from your ATS data. Please note however that any calls that have already been scheduled may still go ahead. Please see [Disabling Metaview](/joining-your-calls/inviting-the-notetaker/disabling-metaview) for details on how to also make sure that the Notetaker bot doesn't join any future calls.
### 6. Connect your Workday tenant to Metaview
Navigate to [https://my.metaview.app/?settings=workday](https://my.metaview.app/?settings=workday). If you haven't previously signed in to Metaview, you will be prompted to do so.
Enter the following credentials:
| Field | Description |
| ------------------ | ------------------------------------------------------------------------ |
| **Workday Host** | Your Workday datacenter hostname (e.g. `wd5-impl-services1.workday.com`) |
| **Workday Tenant** | Your Workday tenant name (e.g. `acme_corp`) |
| **ISU Username** | The username of the Integration System User created in Step 1 |
| **ISU Password** | The password of the Integration System User created in Step 1 |
Click **Connect** to start the integration. Metaview will validate your credentials and permissions. If the connection is successful, the integration process will begin syncing your data. This can take up to 48 hours to complete, and you will be emailed once the integration is successful.
## Features
Integrating Workday Recruiting with Metaview unlocks the following features:
* Worker and recruiting team member sync
* Ability to post your AI Notes as interview feedback in Workday with one click
* Automatic enrichment of interview details (e.g. candidate name, job requisition title, recruiting step, location)
When your interview in Metaview matches to data in your Workday Recruiting instance, you will see the Workday logo in Metaview. Click on the `Workday logo` to navigate directly to the matched candidate's application in Workday Recruiting.
## Troubleshooting
Although Metaview does not automatically schedule interviews from Workday Recruiting, Metaview will still attempt to match your interviews scheduled by other means to the relevant applications and job requisitions in Workday. The most common reasons why this doesn't happen automatically are:
* Interview or candidate is missing in Workday Recruiting
* Duplicate interviews or candidate applications in Workday
* Data mismatch between Metaview invite and information in Workday (e.g. wrong participants, missing participant, wrong candidate name)
* Insufficient information to match interview or candidate (often occurs when using `Inviting to an ongoing call` or `Upload recordings` options)
* The meeting type is NOT set to **Job interview** or **Debrief**. Please see [Call details](https://support.metaview.ai/using-ai-notes/notes-properties/call-details) for more information.
If you believe that a Metaview interview was not matched or was incorrectly matched to your Workday data, please reach out to [our team](mailto:support@metaview.ai) and provide as much data as possible for our team to properly investigate. Please provide specific examples and the relevant identifiers (e.g. Application ID, Job Requisition ID, Candidate ID) from your Workday Recruiting instance.
## Disconnect your Workday integration
You can disable your Metaview integration directly from within your Metaview account under `Settings` → `Integrations` then select `Disconnect Workday`.
This immediately disconnects Metaview from your ATS data. Please note however that any calls that have already been scheduled may still go ahead. Please see [Disabling Metaview](/joining-your-calls/inviting-the-notetaker/disabling-metaview) for details on how to also make sure that the Notetaker bot doesn't join any future calls.